Quick Pick Poo Picking Tool Review

With the lack of daylight hours over winter being a real problem with riders trying to cram in all their chores and keeping their horse ridden and fit with the few hours of sunlight we get a day (especially those that work full time and go to work in practical darkness and leave in darkness I don't get a lot of time in natural daylight to look after Erik!) why not use something that can save you time and effort?
The new, recently launched, Quick Pick mucker is the tool for you!
First Impressions
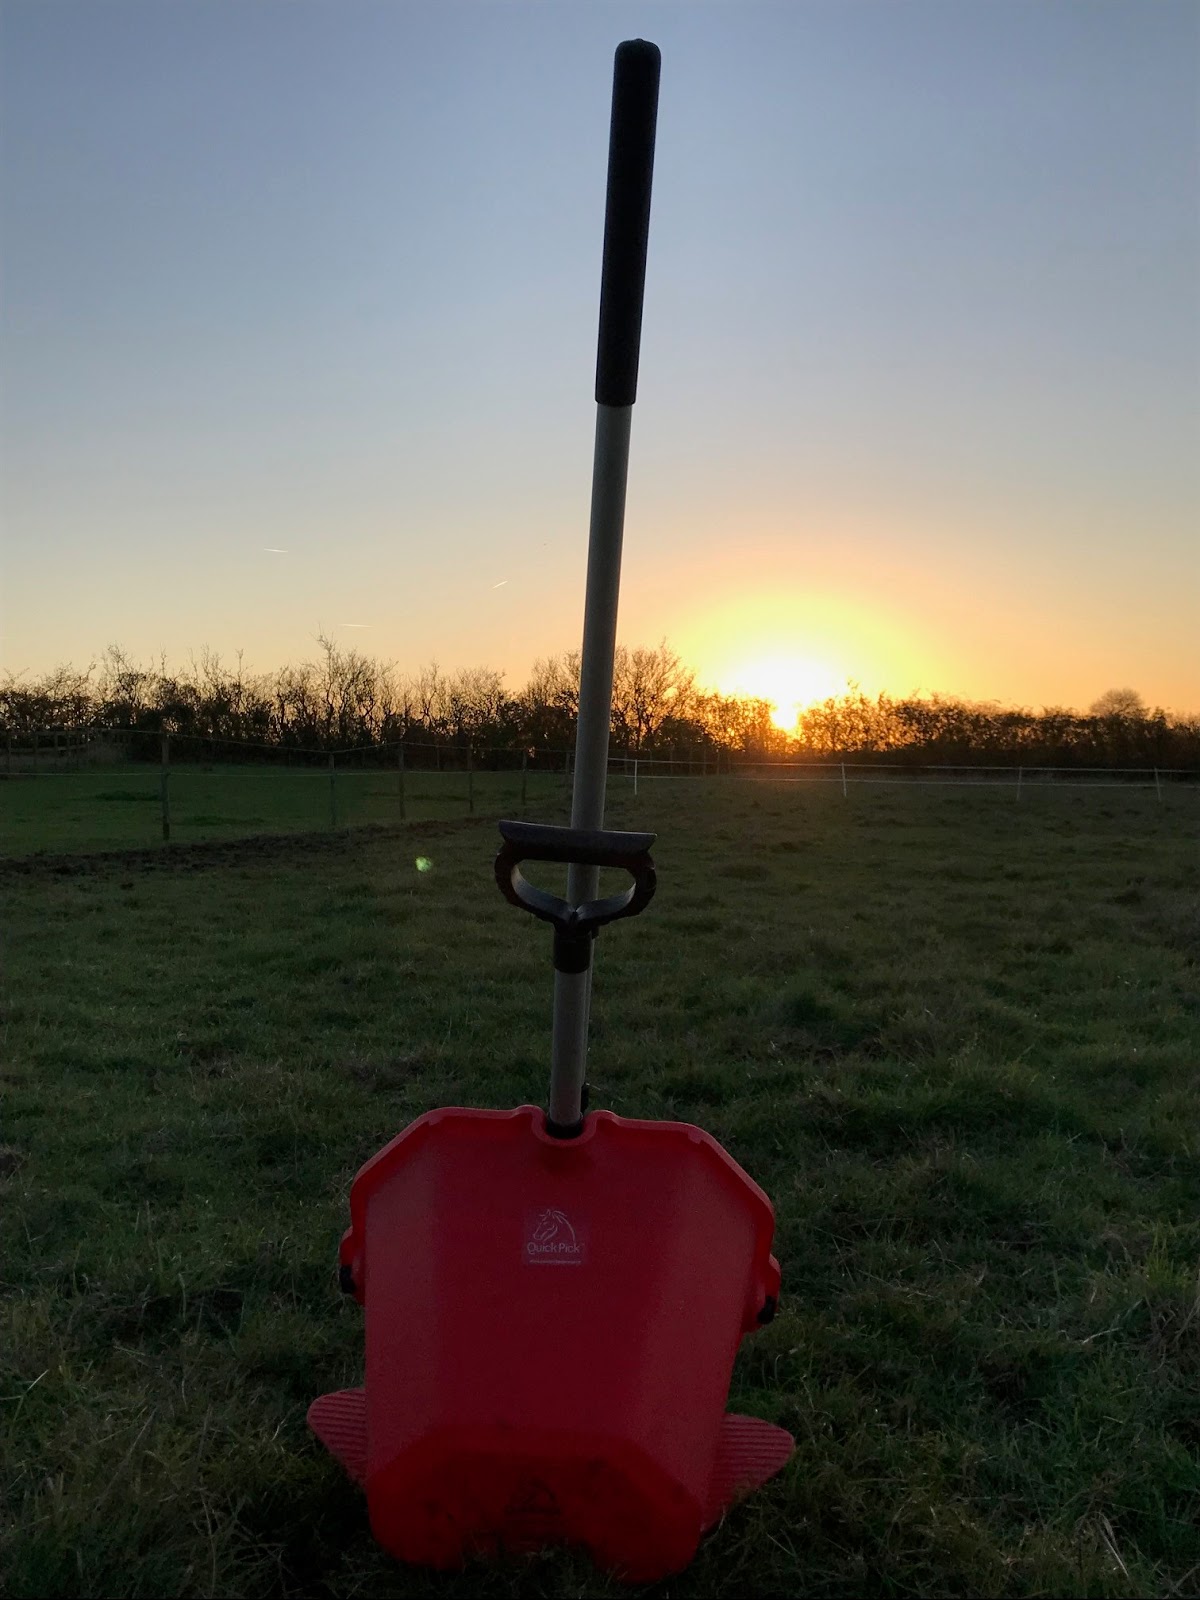
I got sent a beautiful Red Quick Pick by Gary and his team and to say it's beautiful, for a mucker, is accurate because it's so well designed and very sleek; you can tell a lot of thought has gone in to the design.
One of the first things to strike me was just how different they look to a 'normal' mucker that have been around for years; obviously they still have the same overall shape but the little things that bug you about the old style muckers have been added or taken away.
Another wonderful thing to note is that the Quick Pick is fully recyclable so years down the line and your trusty Quick Pick finally gives out after years of use, you can put it in the recycling knowing that it can be broken down and will be used for something else. As someone who is very plastic conscious I love this this!
Design
I love that those little things that aren't quite right or annoying with the old styling poo picking muckers have been thought of and removed or improved here. For example there is no more bending over at 90 degrees to scrape up the poo nuggets with a not very efficient rake. The Quick Pick has been designed so that you can stand with one leg either side of the muckers bucket, put your feet on strategically placed foot holds that keep the bucket in place, so that you can stand upright and with the normal length rake can scope the poop in to the mucker.
Brilliant for back injuries or just not putting undue stress on the muscles and joints round the lumber area of the back. It's also good for your core as, as when you're scooping the poop you're pulling them in to the back and thus 'engaging' your core and giving it a work out which is even better for your riding. Who knew doing a chore could help your riding?!


Little things like a clip on the handle (pictured above) so you can easily keep your rake and Quick Pick together so they don't get lost or separated from each other. Doesn't seem like a big problem but when it's dark and you're searching around in your store room at 6am for the rake because it wasn't kept together and now you can't find it would be a total pain in the bottom.
Use
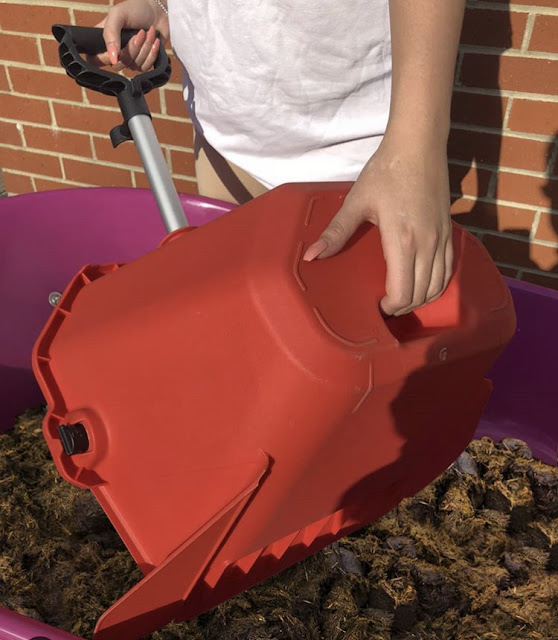
Another part that I love about the Quick Pick is that you can pick up and tip out it's contents without having to strain your wrists. The handle tips on a pivot and has a hand slot at the back so you can easily tip out the contents of the mucker bucket without having to awkwardly twist anything in your wrist, arm, shoulder or back! In the photo below it's so easy to see how it tips!
Plus as the mucker bucket pivots the poo and other junk in the mucker bucket falls to the back so you're far far less likely to drop or spill anything while carrying the Quick Pick back to your wheel barrow or muck heap!
I think this ergonomic design is my favourite feature overall, as some will know that when I broke my wrist I have had some problems since with broken tendons and pain so by not having to twist the mucker to put the contents away I won't be hurting my already compromised wrist. This is a big plus for me because I cannot be 'off my game' when riding!
While the Quick Pick is certainly made for field poo picking I've also found it's dramatically reduced the amount of time it takes me to muck Erik's stable each morning! When you're on a tight schedule like me with trying to get mucked out and the yard clean before work it's been a wonder with picking up so much more muck!
As the bucket is quite a size larger than traditional muckers you can fit in 3 poos in instead of the normal 1 or 2, meaning less stopping and walking over to the wheel barrow! And as I mentioned above, with the tipping of the bucket, is that you don't drop any muck and find stray nuggets all over the stable later!
Regularly readers will also know that we teamed up with HorseDialog a few weeks ago to highlight the importants of Spring Summer #SSTimeItRight which is their campaign to time the worming of your horse at the right to reduce the risk of picking up worm eggs in the summer months so horses didn't head in to winter with a worm burden and now we're in to the winter months its time for #ESRWTimeItRight which is the Encysted Small Red Worm which affects horses in the autumn and winter months as the worms become encysted in the gut wall and then come spring they mass emerge after winter. By regularly picking up droppings in your paddocks you'll significantly reduce the likelihood of your horse(s) getting worms and other parasites that can be transmitted by the grass they eat in their paddocks. It's something I am very conscious of so with the proper worming cycle worming and paddock poo picking you'll help in keeping your horse healthy and happy! Therefore anything to make poo picking in your paddock easier and therefore something you're more likely to do, the better for your horse!
Thoughts
Overall I've been using the Quick Pick Equine poo mucker for around 3 weeks and I genuinely love it! With everything in my life whether equine or otherwise I like tools and items to reduce the workload/time/stress of having to do a chore and I have really found that the Quick Pick has certainly done that for me.
I also love it when the annoying little things that make a chore more difficult or problematic to have had real thought put in to them and the design to reflect the overcoming of those problems and this I have also found with the Quick Pick, it's been designed to speed up the amount of time doing a chore so you can spend more time riding your horse, it's also been designed to put less physical stress on joints and the body which is great! Repetitive strain is a real issue so to make steps to reduce that is a great and a real plus point in my thought process if I was buying one of these.
I can find nothing, if not very little, to fault the Quick Pick in that maybe with the foot slots make it a little too wide for some slimmer wheel barrows to go in face down but nothing that turning it on it's side or at a side angle wouldn't fix. They really are fabulous!

Cost
You can buy all of the items separately or in a bundle all together so you're not locking in to buying part of the Quick Pick if you already have something similar.
To buy the Quick Pick bucket and Quick Rake together it's £49.99. To buy the Quick Pick only is £35 and the Quick Rake only is £25.
Some may scoff at the prices but these items are so hardy and well made. No thin plastic that cracks or splits after only a few uses or if you drop it. I've actually dropped the Quick Pick a couple of times from my wheelbarrow on to concrete and it's not even put a scratch on it!
They're extremely well made and are actually manufactured here in the United Kingdom, which I absolutely love! It's supporting local business and our economy, so none of the cheap imports!
You can buy a Quick Pick online via their website (which is easy to navigate and use, plus it looks beautiful too) https://quickpickequine.co.uk/ or if you're heading over to Olympia in December then they will be at stand H287 so if you'd prefer to 'Try Before You Buy' then head over to their stand and have a go scooping in their 'poo potatoes' and get it from them directly!
Would I recommend the Quick Pick.... a resounding yes, very much so!
*If you read this blog and think you'd like me to try out a product and give it a rigorous test then drop me a message https://www.facebook.com/horsiness
First Impressions
I got sent a beautiful Red Quick Pick by Gary and his team and to say it's beautiful, for a mucker, is accurate because it's so well designed and very sleek; you can tell a lot of thought has gone in to the design.
One of the first things to strike me was just how different they look to a 'normal' mucker that have been around for years; obviously they still have the same overall shape but the little things that bug you about the old style muckers have been added or taken away.
Another wonderful thing to note is that the Quick Pick is fully recyclable so years down the line and your trusty Quick Pick finally gives out after years of use, you can put it in the recycling knowing that it can be broken down and will be used for something else. As someone who is very plastic conscious I love this this!
Design
I love that those little things that aren't quite right or annoying with the old styling poo picking muckers have been thought of and removed or improved here. For example there is no more bending over at 90 degrees to scrape up the poo nuggets with a not very efficient rake. The Quick Pick has been designed so that you can stand with one leg either side of the muckers bucket, put your feet on strategically placed foot holds that keep the bucket in place, so that you can stand upright and with the normal length rake can scope the poop in to the mucker.
Brilliant for back injuries or just not putting undue stress on the muscles and joints round the lumber area of the back. It's also good for your core as, as when you're scooping the poop you're pulling them in to the back and thus 'engaging' your core and giving it a work out which is even better for your riding. Who knew doing a chore could help your riding?!

No stooping or bending to pick up!
Photo by Quick Pick

Securely place your feet either side and then scoop
Little things like a clip on the handle (pictured above) so you can easily keep your rake and Quick Pick together so they don't get lost or separated from each other. Doesn't seem like a big problem but when it's dark and you're searching around in your store room at 6am for the rake because it wasn't kept together and now you can't find it would be a total pain in the bottom.
Use
Another part that I love about the Quick Pick is that you can pick up and tip out it's contents without having to strain your wrists. The handle tips on a pivot and has a hand slot at the back so you can easily tip out the contents of the mucker bucket without having to awkwardly twist anything in your wrist, arm, shoulder or back! In the photo below it's so easy to see how it tips!
Plus as the mucker bucket pivots the poo and other junk in the mucker bucket falls to the back so you're far far less likely to drop or spill anything while carrying the Quick Pick back to your wheel barrow or muck heap!
I think this ergonomic design is my favourite feature overall, as some will know that when I broke my wrist I have had some problems since with broken tendons and pain so by not having to twist the mucker to put the contents away I won't be hurting my already compromised wrist. This is a big plus for me because I cannot be 'off my game' when riding!

No twisting, an easy handle on the back and the main handle pivoting the bucket for easy emptying!
Photo by Quick Pick
While the Quick Pick is certainly made for field poo picking I've also found it's dramatically reduced the amount of time it takes me to muck Erik's stable each morning! When you're on a tight schedule like me with trying to get mucked out and the yard clean before work it's been a wonder with picking up so much more muck!
As the bucket is quite a size larger than traditional muckers you can fit in 3 poos in instead of the normal 1 or 2, meaning less stopping and walking over to the wheel barrow! And as I mentioned above, with the tipping of the bucket, is that you don't drop any muck and find stray nuggets all over the stable later!
Regularly readers will also know that we teamed up with HorseDialog a few weeks ago to highlight the importants of Spring Summer #SSTimeItRight which is their campaign to time the worming of your horse at the right to reduce the risk of picking up worm eggs in the summer months so horses didn't head in to winter with a worm burden and now we're in to the winter months its time for #ESRWTimeItRight which is the Encysted Small Red Worm which affects horses in the autumn and winter months as the worms become encysted in the gut wall and then come spring they mass emerge after winter. By regularly picking up droppings in your paddocks you'll significantly reduce the likelihood of your horse(s) getting worms and other parasites that can be transmitted by the grass they eat in their paddocks. It's something I am very conscious of so with the proper worming cycle worming and paddock poo picking you'll help in keeping your horse healthy and happy! Therefore anything to make poo picking in your paddock easier and therefore something you're more likely to do, the better for your horse!
Thoughts
Overall I've been using the Quick Pick Equine poo mucker for around 3 weeks and I genuinely love it! With everything in my life whether equine or otherwise I like tools and items to reduce the workload/time/stress of having to do a chore and I have really found that the Quick Pick has certainly done that for me.
I also love it when the annoying little things that make a chore more difficult or problematic to have had real thought put in to them and the design to reflect the overcoming of those problems and this I have also found with the Quick Pick, it's been designed to speed up the amount of time doing a chore so you can spend more time riding your horse, it's also been designed to put less physical stress on joints and the body which is great! Repetitive strain is a real issue so to make steps to reduce that is a great and a real plus point in my thought process if I was buying one of these.
I can find nothing, if not very little, to fault the Quick Pick in that maybe with the foot slots make it a little too wide for some slimmer wheel barrows to go in face down but nothing that turning it on it's side or at a side angle wouldn't fix. They really are fabulous!

Cost
You can buy all of the items separately or in a bundle all together so you're not locking in to buying part of the Quick Pick if you already have something similar.
To buy the Quick Pick bucket and Quick Rake together it's £49.99. To buy the Quick Pick only is £35 and the Quick Rake only is £25.
Some may scoff at the prices but these items are so hardy and well made. No thin plastic that cracks or splits after only a few uses or if you drop it. I've actually dropped the Quick Pick a couple of times from my wheelbarrow on to concrete and it's not even put a scratch on it!
They're extremely well made and are actually manufactured here in the United Kingdom, which I absolutely love! It's supporting local business and our economy, so none of the cheap imports!
You can buy a Quick Pick online via their website (which is easy to navigate and use, plus it looks beautiful too) https://quickpickequine.co.uk/ or if you're heading over to Olympia in December then they will be at stand H287 so if you'd prefer to 'Try Before You Buy' then head over to their stand and have a go scooping in their 'poo potatoes' and get it from them directly!
Would I recommend the Quick Pick.... a resounding yes, very much so!
*If you read this blog and think you'd like me to try out a product and give it a rigorous test then drop me a message https://www.facebook.com/horsiness